Hello all,
It's only been...oh...6 1/2 months or so! We've been busy and there's lots to say about that, but lately my creative energy has been consumed by cranking out the scrapbook layouts. Here's what I've made most recently (almost done with our NYC trip we took this past November!)
Thursday, July 24, 2014
Sunday, January 12, 2014
Happy New Year, Friends!
Happy New Year Friends! The blog has been a little quiet and
that was all a part of my plan. I’ve realized that I have to live an interesting
life to have an interesting blog so I’ve spent half of this little hiatus being
boring and the other half of it coming out of my hibernation and therefore
actually having something to write about.
I got on this massive organization/purging kick right after
Christmas and have been sorting through all those boxes that your parents give
you when you move out which you then shove into a closet to deal with…well, in
my case, about five years later. I’ve got to tell you it feels GREAT! I got
from six boxes down to one and I feel like I actually know what I own instead
of just having a vague feeling that “I might have one of those somewhere…”
Total confession: the only thing I found in the boxes that really made me
cringe was some thank you notes I forgot to send out from our wedding. Yup,
fully written, addressed, and in some cases even stamped…just not sent. There
were only about six but it was a funny little time capsule, there was one to a
couple who are now both married to other people and one to someone who was a
friend at the time and is now my sister-in-law!
Other than that we’ve just been enjoying the holidays with
family and friends…things got considerably less crazy the weekend before
Christmas so I was actually able to enjoy it. It was weird not seeing Nathan’s
family but they were having a blast down in San Diego and we got to Skype with
them on Christmas night. Actually one of the highlights was on Christmas Eve we
were at my parent’s house with all the relatives. My Aunt and Uncle are into
Scottish Ceilidh dancing so we pushed all the furniture out of the way and got
a little dance party going by the Christmas tree. It just felt so…idyllic. Of
course, I then made the mistake of exclaiming, “I feel like I’m in Pride and
Prejudice!” After that it was a little bit harder to get the guys to dance with
us!
Enjoying Snowflake
Lane with Brad and Nicole
Quiet Christmas
morning
mmm….scotch!
On New Year’s Eve we had a most delicious dinner with
friends followed by Bingo and fondue (because apparently we’re from the 70’s).
We headed down to Gasworks Park before midnight thinking we’d be able to see
the Space Needle fireworks across South Lake Union but it was so foggy we
couldn’t see fifty feet in front of us! We still had fun ringing in the New
Year and promptly heading home to go bed so I could get up and be at work at 7
the next morning.
Happy New Year! (Nice face, Nathan!)
Sunday, December 22, 2013
Emily Gets Crafty: Pine Cone Christmas Ornament
Two craft posts in one week? I tend to make a HUGE mess when I'm feeling creative so I try to get it all out my system at once. Besides, this adorable pine cone ornament will be totally irrelevant in a few days.
I love this craft it's easy, it's pretty quick (took me less than 45 minutes), and it makes a GREAT gift. I set out to just model the first few steps for you and then via the wonders of the internet present one that is already done (ie: one I made last year), but I was having so much fun I accidentally made the whole ornament!
Here's what we're going for:
Supplies:
-Paper trimmer (or scissors/ruler)
-1 sheet of scrapbooking paper
-a Styrofoam egg from a craft store
-small straight pins
-ribbon/twine
Start by cutting 1"X1" squares of paper. Take a square and gently crease it down the middle (not folding, more like bending). Then take two corners and fold them toward the midline, the result should look like this:
Next start to affix the pieces of paper to your egg. The points of the paper should be facing down toward the narrow end of the egg. Attach them with two straight pins in either upper corner.
Your pine cone will look terrible at first...don't worry, as more of the pieces of paper are attached they will start to lie more uniformly. I usually pin four pieces to the bottom to form a point (this is when it looks the worst). From there work your way around the egg slowly spiraling upward overlapping the pieces so that none of the egg shows through underneath.
Work your way to the top of the pinecone, in the end you should have a small empty circle at the top. Mine in the picture is a little bit bigger than normal because I was just using scraps of paper and ran out, but even a circle this big is okay.
I then cut a "wiggly" circle out of a coordinating piece of paper, fold it in half one way and cut a slit perpendicular to the fold, then fold it in half the other way and cut another the slit, the result is an "X", this is what we'll use to attach the ribbon to.
Finally, make a loop with your ribbon knotting it at one and and stick the loop up through the "X" you just cut. The knot will keep the ribbon from slipping out. You can then either attach the top with straight pins or with hot glue/craft glue if you have it. The top will not lie flat, it's not supposed to, that's why we cut a "wiggly" circle so it would look good with the ripples.
And VOILA! Pine Cone ornament, perfect to enjoy on your tree or be given as a gift
I love this craft it's easy, it's pretty quick (took me less than 45 minutes), and it makes a GREAT gift. I set out to just model the first few steps for you and then via the wonders of the internet present one that is already done (ie: one I made last year), but I was having so much fun I accidentally made the whole ornament!
Here's what we're going for:
Supplies:
-Paper trimmer (or scissors/ruler)
-1 sheet of scrapbooking paper
-a Styrofoam egg from a craft store
-small straight pins
-ribbon/twine
Start by cutting 1"X1" squares of paper. Take a square and gently crease it down the middle (not folding, more like bending). Then take two corners and fold them toward the midline, the result should look like this:
Your pine cone will look terrible at first...don't worry, as more of the pieces of paper are attached they will start to lie more uniformly. I usually pin four pieces to the bottom to form a point (this is when it looks the worst). From there work your way around the egg slowly spiraling upward overlapping the pieces so that none of the egg shows through underneath.
Work your way to the top of the pinecone, in the end you should have a small empty circle at the top. Mine in the picture is a little bit bigger than normal because I was just using scraps of paper and ran out, but even a circle this big is okay.
I then cut a "wiggly" circle out of a coordinating piece of paper, fold it in half one way and cut a slit perpendicular to the fold, then fold it in half the other way and cut another the slit, the result is an "X", this is what we'll use to attach the ribbon to.
And VOILA! Pine Cone ornament, perfect to enjoy on your tree or be given as a gift
Saturday, December 21, 2013
What I'm Eating on Christmas:
We're getting down to the wire...the last week has been a blur of Christmas parties but we have the next few nights relatively free, I got the last few Christmas cards in the mail and now I'm sitting down to put together the menu for Christmas dinner. I love sharing recipes and getting recommendations from other people so I thought, "why not kill two birds with one stone and blog my Christmas dinner?"
Most people who know me know that I almost never cook. Nathan does most of our day to day cooking (really.) I just have the hard time wanting to put in the effort for just two people...but I LOVE cooking for groups of people, dinner parties are my jam. This year Nathan's family is going to be down in San Diego so I'll only be cooking for seven, it's a little more manageable than the usual 15 so I decided to be a little more ambitious with my menu.
Some of you may recognize some of these recipes because they're yours (thank you), others are ones that I'm "famous" for, and I'm even trying a few new ones...bold, I know.
Two things before I get started:
- These recipes are actually going to span Christmas Eve AND Christmas Day...but I'm going to lay them out as if it's all one day.
-Gotta give a shout out to Pepperplate! My friend Mackenzie turned me on to this website and I LOVE it for organizing and uploading my recipes all to one place. PLUS Nathan has the app on his phone so I can send him a grocery list when we're not together.
Breakfast:
This is a new recipe for me so we'll see how it turns out. But I really like that I can make it the day before and then bake it on Christmas morning.
Hors d'ouevres:
Triscuits with Cucumber, Cream Cheese, and Dill
I got this recipe from my friend Claire and it is always one of the first plates empty at a party!
Triscuits (plain or one of their fun flavors like peppercorn)
Cucmber
Cream Cheese
Powdered Ranch Dressing
Fresh Dill
-Mix one packet of the powdered ranch dressing into some cream cheese (probably about a cup)
-Spread onto a Triscuit
-Top with sliced (and peeled, if you like) cucumber
-Garnish with a sprig of dill on top
Bacon-Wrapped Stuffed Dates
This recipes has you also stuffing the dates with almonds but I'm not a huge almond fan so I just stick to the goat cheese.
A little tip our friends Claire (different Claire) and Brian showed us on vacation one time...coat the bacon in two parts brown sugar, one part cayenne pepper...the sugar caramelizes onto the bacon and gives it a sweet/spicy kick.
Dinner:
Caesar Salad (nothing special)
Artisan Bread w/ Oil & Vinegar for Dipping
Asparagus Soup with Herbed Goat Cheese
We love this soup, it's easy but it feels fancy, and it's green which adds some nice color to the table.
Another new recipe! When I saw this recipe it made me think of THIS "iconic" movie scene.
Side note: I'm going to use red potatoes instead of Yukon
Dessert:
Candycane Cheesecake
2 tbsp. granulated sugar [for crust]
1/4 c. butter, melted [for crust]
1 1/2 c. sour cream [for filling]
1/2 c. granulated sugar [for filling]
3 eggs [for filling]
1 tbsp. flour [for filling]
2 tsp. vanilla extract [for filling]
1/4 tsp. peppermint extract [for filling]
3 (8 oz.) pkgs. cream cheese [for filling]
2 tbsp. butter, softened [for filling]
2/3 c. crushed peppermint candy [for filling]
Sweetened whipped cream (1/2 of recipe)[for
topping]
Preheat oven to 325 degrees. Combine first 3 ingredients and press into the bottom of a 9-inch springform pan; set aside. In blender, blend sour cream, 1/2 cup sugar, eggs, flour, and extracts until smooth. Add cream cheese and 2 tablespoons butter, blending until completely smooth. Stir in crushed candy.
Pour into crust. Bake on lowest rack of oven for 50-60 minutes or until firm. Allow to cool (cheesecake may crack while cooling), refrigerate overnight.
To serve, use knife to loosen sides of cheesecake from pan; remove springform. Spread top of cheesecake with sweetened whipped cream. Garnish with round candy cane. Serves 10.
Tuesday, December 17, 2013
Welcome to the Family, Katie!
I’m getting a new sister! That’s the news around the block
the past week and now I can finally talk about it! My little brother, Jeff,
popped the question yesterday at sunset to his sweet, beautiful girlfriend
Katie and we couldn’t be more excited. People have asked me if I like her, if I’m
glad they’re getting married and my answer has been, “um…have you MET her?”
Unless they haven’t met her in which case my answer is yes, yes we are very
glad they’re getting married.
Jeff has been barely able to contain his excitement since he
bought the ring a couple of weeks ago, carrying it with him everywhere, showing
it to us at church. It was lucky for me that Katie’s been in Germany so I didn’t
have to keep the secret for too long. We were laughing last night about how
rude I was being ignoring her at church on Sunday, walking away when she came
up to our group of friends to talk, but I just didn’t trust myself not to let
something slip!
He took her on a highlight of their favorite dates
throughout the day and got down on one knee at Discovery Park at sunset (which
was uncharacteristically stunning for Seattle in December). They went out to
dinner at Il Bistro and then came over to Bellevue for an engagement party
hosted at Nathan’s parent’s house. Their friend Preston took pictures of the
actual moment on bended knee and it was kind of surreal to see. It made me
realize that in my head Jeff is still 7 years old and not nearly old enough to
be getting married.
The cherry on top is that one of Katie’s best friends is
Nathan’s little sister so there is already a tangled web of familial
connections that will only get more entwined with marriage.
To Jeff and Katie: Nathan and I are so excited for you and
what this adventure is going to look like in your life. Marriages have been
happening throughout history and of course there are the dos and don’ts but the
really neat thing is that everybody’s journey is unique to the two of them and
I can’t wait to see what yours looks like. We’re excited to support you and
hopefully not add too much to the craziness that is an engagement. Even more
than being excited for you wedding, I’m looking forward to 20, 30, 40 years
down the road when this is a distant memory and you’ve gotten to enjoy all that
time being married to each other. We love you two.
"okay everybody....look REALLY excited!"
Monday, December 16, 2013
Emily Gets Crafty
I'm still figuring out this blogging thing, it can feel weird talking to the ether and feels a bit presumptuous to think many people are interested in what I have to say. However, one area I do feel confident in is anything creative. I'm excited to bring you my new projects from time to time and maybe spark some ideas.
I mentioned how writing on this little blog has gotten my creative juices flowing in other parts of my life. The latest outlet is quilling and I AM ADDICTED!
It all started when I saw this. I love all things paper-crafty (scrap-booking is my main obsession) but I really don't like "kitschy" stuff, this alphabet was perfect, very classy.
The best thing is it really wasn't that hard, so without further ado....the tutorial:
What you need:
-Quilling strips (I used 3/8" for a more dramatic look but 1/8" is the standard)
-A slotted quilling tool (you can also use a needle or toothpick)
-Craft glue
-Tweezers
-Scissors
-Paintbrush
- A shadow box if you're going to mount what you made.
For the letters I printed out a big letter in the font I wanted on printer paper, placed it on top of my mounting paper (a little bit heavier stock) and then traced the outline. The result is an indented outline on the mounting paper underneath.
I chose a strip of paper that I wanted to use to outline the letter and laid it along the outline without gluing it down, creasing and folding in the appropriate places. I then brushed the glue and tacked it down section by section until the outline was done. I really liked the Alena's Turbo Tacky glue because it dried pretty quickly so you weren't sitting there forever trying to wait for the paper to stick.
Next I started curling the paper. It's pretty easy to figure out on your own. If you have a slotted tool you just put the edge of the paper in and start twirling. I placed my thumb and forefinger on the top and bottom of the roll to keep it all even.
When you have rolled the paper around the tool you and slide it off and either let it unspool a little bit for a looser, bigger coil or glue it down right away for a smaller, tighter one.
There are lots of cool shapes you can make besides just coils. I found this website super helpful in trying out some different shapes. I mostly used "S coils" and "shaped tear drops" but I'm sure as I complete more projects I'll branch out a little more.
I found it best to make the coils all first and not glue any down. I didn't have an exact idea of how I wanted to fill the space so it was nice to be able to move them around and play with them. Once you have them situated how you like you can start gluing them down.
I started at one end of the letter and worked toward the other. Here's where the paintbrush and tweezers really come in handy. Sometimes I would paint the sides of the coils to glue them to each other and sometimes I would brush the glue directly onto the mounting paper. Either way works it just gets harder as you get closer to being done (kind of like painting yourself into a corner), the tweezers were nice because you could grab the coils and hold them where you needed them until they were dry, but they weren't necessary.
And just like that, you're done! Enjoy your handiwork...or if not your own, enjoy mine!
When I start my next quilling project (and there WILL be a next quilling project) I'll take pictures as I go and update this post.
I mentioned how writing on this little blog has gotten my creative juices flowing in other parts of my life. The latest outlet is quilling and I AM ADDICTED!
It all started when I saw this. I love all things paper-crafty (scrap-booking is my main obsession) but I really don't like "kitschy" stuff, this alphabet was perfect, very classy.
The best thing is it really wasn't that hard, so without further ado....the tutorial:
What you need:
-Quilling strips (I used 3/8" for a more dramatic look but 1/8" is the standard)
-A slotted quilling tool (you can also use a needle or toothpick)
-Craft glue
-Tweezers
-Scissors
-Paintbrush
- A shadow box if you're going to mount what you made.
For the letters I printed out a big letter in the font I wanted on printer paper, placed it on top of my mounting paper (a little bit heavier stock) and then traced the outline. The result is an indented outline on the mounting paper underneath.
I chose a strip of paper that I wanted to use to outline the letter and laid it along the outline without gluing it down, creasing and folding in the appropriate places. I then brushed the glue and tacked it down section by section until the outline was done. I really liked the Alena's Turbo Tacky glue because it dried pretty quickly so you weren't sitting there forever trying to wait for the paper to stick.
Next I started curling the paper. It's pretty easy to figure out on your own. If you have a slotted tool you just put the edge of the paper in and start twirling. I placed my thumb and forefinger on the top and bottom of the roll to keep it all even.
When you have rolled the paper around the tool you and slide it off and either let it unspool a little bit for a looser, bigger coil or glue it down right away for a smaller, tighter one.
There are lots of cool shapes you can make besides just coils. I found this website super helpful in trying out some different shapes. I mostly used "S coils" and "shaped tear drops" but I'm sure as I complete more projects I'll branch out a little more.
I found it best to make the coils all first and not glue any down. I didn't have an exact idea of how I wanted to fill the space so it was nice to be able to move them around and play with them. Once you have them situated how you like you can start gluing them down.
I started at one end of the letter and worked toward the other. Here's where the paintbrush and tweezers really come in handy. Sometimes I would paint the sides of the coils to glue them to each other and sometimes I would brush the glue directly onto the mounting paper. Either way works it just gets harder as you get closer to being done (kind of like painting yourself into a corner), the tweezers were nice because you could grab the coils and hold them where you needed them until they were dry, but they weren't necessary.
And just like that, you're done! Enjoy your handiwork...or if not your own, enjoy mine!
A "J" I made for my little sister-in-law Julie
"G" is for Grimm!
Sunday, December 15, 2013
Tradishuuuunnnn! (tradition!)
We have this joke in our family: If you want to get me to do
something, just tell me it’s a “tradition”. I’m the
tradition-keeper/creator/drill sergeant in our family. This goes double for
Christmas time. After I moved out for college my mom once told my siblings not
to let me know that they’d gone to a different tree farm than normal to cut
down the Christmas tree (seriously!).
I’m learning to let some of these go so as not to make
myself crazy and thus defeat the point of trying to get in the Christmas
spirit. As I am fully aware of how ridiculous I am when it comes to
tradition-adherence, here is a self-deprecating look at some of my Christmas
magic-making traditions (both past and present) and how they’ve changed now
that it’s Nathan and I carrying them on. I’d love even more to hear some of yours; I’m
always looking for good ideas.
Getting the Tree:
OLD: This
MUST be done the weekend after Thanksgiving to allow for maximum tree-enjoyment
time. We must all drive out to the tree farm in North Bend, we must walk around
forever and get into many fights involving tears and angry words about “whose
turn it is to pick out a tree” (“Nuh-uh…you got to pick the tree LAST YEAR!)
Once we somehow decide on a tree we all go in the little shed and drink hot
chocolate and eat a candy cane while my dad tries to tie it onto the car.
NEW: This
still has to be done the weekend after Christmas, this year we went and cut
down our tree a few hours after running the half marathon. We found a great new
place where all the trees are basically perfect so we just pretend to fight for
a few minutes (we TOTALLY got YOUR tree last year!) because, well, it’s
tradition. But now I grab cider for both of us and then actually help Nathan
get the tree on the car.
The Nativity Set:
OLD: My
family has a really beautiful ceramic nativity set made by my great great aunt
Dede. It’s been the in family at least twenty years and is still in the
original cardboard apple box, with the original packing peanuts, and the pieces
are wrapped in the original paper towels! After the house is decorated we
gather ‘round the box and take turns plunging our hands into the nasty packing
peanuts to see what we pull out. Sounds pretty normal, right? Well, I have no
idea how this started but once all of the pieces have been pulled out we take
turns sticking our heads IN the box and then pulling them out to have the
peanuts stuck in our hair. Everybody has to do it. I can only imagine what
Nathan thought the first time he witnessed this whole situation go down.
NEW: The
first year we were married my mom bought me my very own beautiful willow tree
nativity set, complete with a large cardboard box, packing peanuts, and paper
towels. We haven’t changed a single thing about this tradition in our home. I’ll
let you know how the peanuts and paper towels are doing in twenty years…
The Candlelight Service:
OLD: Every
year I try to keep myself up so we can go to church for the Christmas Eve
Candlelight service. It’s simple, peaceful, and solemn and always just what I
need to get my heart in the right place. We sing Christmas carols and read the
Christmas story out of the Book of Luke, the last one we sing is “Silent Night”.
The church is completely dark and everyone is holding unlit candles. One candle
is lit at the front and the flame is passed back through the church until
everything has a soft quiet glow.
NEW:
Nothing has changed about this tradition either, it’s my favorite one. I know
it’s a favorite for others too because there are a few old friends that I’ve
mostly lost touch with, but I see them every year at this service. It doesn’t
get done until just after midnight and I love getting to officially wish
everyone “Merry Christmas” before heading home.
New Traditions:
Painting Ornaments: Every November Nathan and I go to paint
the town and we each paint an ornament. It’s really sweet that he humors me
this way, I’m usually WAY more intricate with mine so he just ends up sitting
there waiting for me to finish (and he usually leaves to make a Starbucks run).
It’s so fun to take them out every year and see what we’ve painted from years
past. We’re starting to amass quite the collection.
Christmas Dinner and Devotional: We are so so lucky. Our families
actually like spending time together. Every year on Christmas I host a dinner
with both of our families and it’s a huge blessing not to feel torn between two
houses. It’s not very fancy, usually baked potatoes or something I can prepare
ahead of time, and it’s quite crowded…there are 15 people just in our immediate
families. But it’s a great time to get together, eat, play games, and Nathan
usually reads us a Christmas themed devotional after dinner. We have a favorite
that is made up of the stories behind the people who wrote beloved Christmas
Carols.
So, yeah, I’m a little crazy. I’ve always been a very
sentimental and nostalgic person so this personality quirk isn’t entirely
surprising but I’ve been trying to be careful this year to only celebrate the
traditions that build in meaning, not obligation to this season. There can be
so much a sense of expectation and performance that really steals the joy and
magic. I’ve had to learn that just because it was great once doesn’t mean it
will be great the following twenty times. I can tend to really fall victim to
trying to incorporate traditions merely to try to recreate the magic of
something that happened in an organic way, which is just not the same thing. It’s
a learning process…hey! Maybe cutting one tradition every year can be my new “tradition”!
Saturday, December 14, 2013
The 12...er...11 days of Christmas: Jimmy Fallon Flashback!
Life has been crazy lately...as soon as we finished the marathon we had to turn around and start our final rehearsals for the Christmas show Nathan and I are dancing in at church. We actually just finished our first show of the day and I'm sitting in a Starbucks writing this and waiting for our next call time.
I'm going to try ("try" being the operative word) to write a post every day leading up to Christmas. Even though writing is not a particularly creative endeavor for me, the act of sitting down and doing it gets my creative mind really flowing in other directions, something I really enjoy the effects of as you'll see in a post later this week!
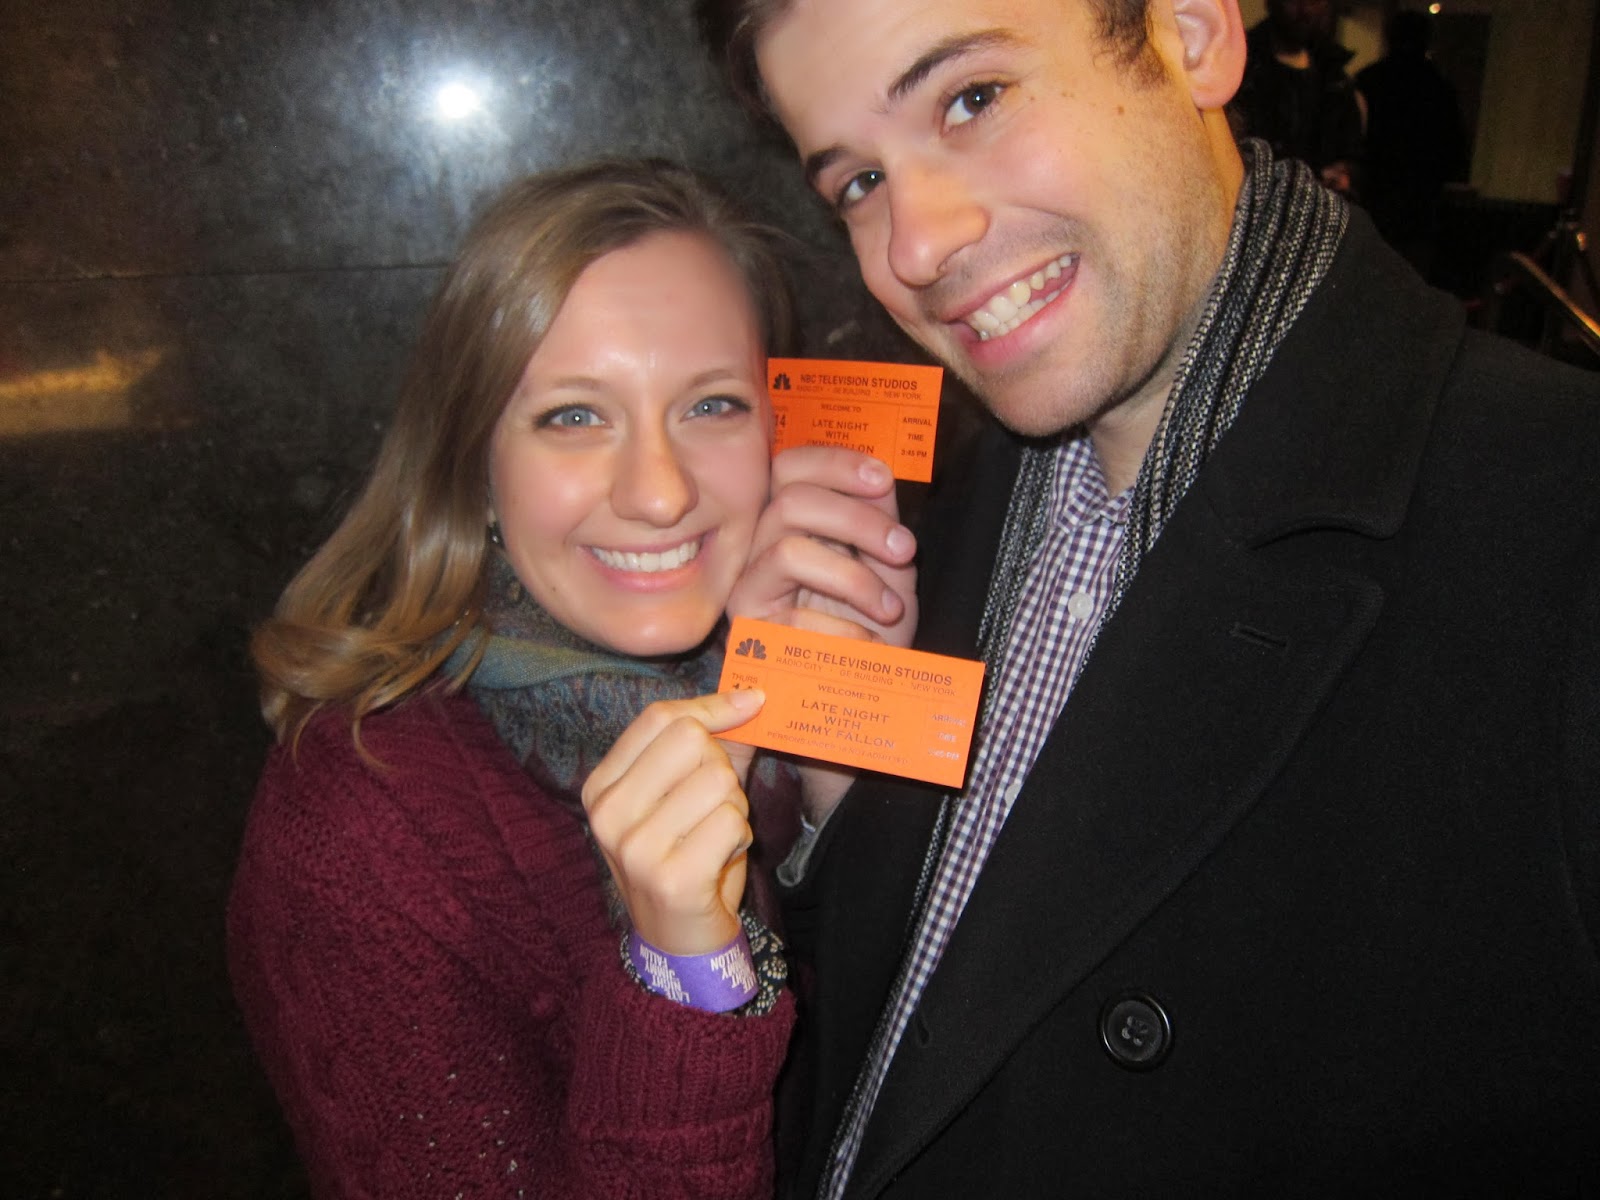
For this installment, as requested, a flashback to New York and our trip to see Jimmy Fallon taped live! Enjoy:
I'm going to try ("try" being the operative word) to write a post every day leading up to Christmas. Even though writing is not a particularly creative endeavor for me, the act of sitting down and doing it gets my creative mind really flowing in other directions, something I really enjoy the effects of as you'll see in a post later this week!
For this installment, as requested, a flashback to New York and our trip to see Jimmy Fallon taped live! Enjoy:
We spent Thursday morning laying low, Nathan took some of
our clothes to the laundromat and I wasn’t feeling great so he let me lay
around on the couch all morning. But we couldn’t do that all day, oh no sir,
Thursday was Jimmy Fallon day!
I was pretty anxious about getting down to 30 rock in time,
I had heard it could be pretty hectic getting in and even though I had gotten
the initial ticket (a feat in and of itself) they overbook all their shows so
we weren’t guaranteed to get in. We found the place we were supposed to meet
early and I was a stressed out wreck until we got our wristbands. *deep
breath*. Now that I knew we were “in” we got to walk around and explore
Rockefeller Plaza, which was super fun! They already had the big Christmas tree
up but there was scaffolding around it and they were trimming off branches so
it was hard to see. We watched the ice skaters and found all the places they
took for the opening shots of the show 30 rock. Before we knew it, it was time
to come back for the taping!
They totally seat you based on how you look. When you get
your wristband they give you a letter, it has nothing to do with what time you
get there. It’s not exactly a great practice but I had been reading a yelp
review about the show and knew they were
going to do it so I tried to look like my usual “desirable demographic” self.
Well it worked! We got to sit in the fourth row on the aisle. It was kind of
weird though because they fill in the “pretty people” first (please know what
we’re being sarcastic…but that’s how Nathan and I referred to each other as the
rest of the night) and then everybody else sort of has to climb in over you,
they aren’t too subtle about it.
One of the head writers came out to give us a rundown of how
the taping was going to work and she was super funny (of course) so she did a
really good job of getting us pumped up. After her the Roots came out and
played some music and they had Wanz as a guest musician, which was SO great,
and by then we were all bouncing off the walls.
The taping itself just flew by, Jimmy only stopped and
started over after one little introduction. He was so high energy and just
seemed like he was having a great time. It made me think that it would be weird
to have to be so intense about the same thing every day, but he put on a great
show. Damian (Lewis?) from Homeland was on, along with Steve Coogan who did
some pretty great impressions.
It was super interesting to see all of the stuff that goes
on behind the scenes to make the show happen and to see how Jimmy could be
funny and spontaneous while still keeping track of so many other things and
timing stuff perfectly.
I was excited when I heard they were going to play a game
with the guests, those are always my favorite episodes, they played charades
and I was so into it I almost yelled out the answer on accident! Sheryl Crow
was the musical guest, I’ve never really liked her music at all, but she did
actually sound really good live. Usually the musician sticks around afterward
while Jimmy is saying goodbye but I think she had to catch a flight so she just
left right after the song so he had to do a kind of awkward closing. But then
came the best part…he ran through the aisles of the audience and Nathan and I
both got high-fives. I’m typically more star struck by that type of thing than
Nathan is but I still played it cool.
And WOOSH! Just like that it was over, what an experience to
have!
While we had been
waiting to get our tickets for Jimmy, Nathan had called and gotten us some
last-minute tickets to First Date, a new Broadway show starring Zachary Levi
from Chuck (a show we love). It worked out perfectly; we grabbed a quick dinner
and just walked over to the theater. I wasn’t expecting too much from the show,
it hadn’t gotten a great review in the NY Times, but the tickets weren’t very
expensive so we thought we’d give it a try. We ended up LOVING it! It was
definitely a little bit edgier than Newsies (but Newsies is Disney, so that’s
not saying much). The story wasn’t incredibly original but they told it in a
really cool way. There were only seven people in the cast so they all played a
bunch of characters and handled the sets and the costumes in a really creative
way.
Zachary Levi was so much better than I was expecting! I
really liked him in Chuck, but you know how sometimes on t.v. it seems like
people might just be playing themselves? It was fun to get to see him play a
different character. He had GREAT comedic timing and the guy can SING! I’ve
still got some of the songs stuck in my head three days later.
We were leaving the theatre after the show and saw a little
barricade set up along the side of the theatre with about 20 people standing
around it. I figured the actors/actresses would probably be coming out later
but we kept walking. After about half a block we decided, “What the heck, it
was pretty warm out; we can at least wait for ten minutes…” I ended up getting my playbill signed by the
whole cast and got to chat with each of them for a minute. Zach came out last
and couldn’t have been nicer. We were standing at the end of the barricade so
we were the last ones there. We got to tell him we liked the show and joked
around a little bit and he was even nice enough to take a picture with us! I
asked him if it would be weird to use the picture for our Christmas card and he
laughed but he wasn’t sure whether we were serious or not…at the time neither
was I. Full disclosure: I did upload
the picture into our Christmas card just to see if it looked weird…it did. I
can’t believe I just admitted that to you all!

Ah well, at least we felt famous for a night!
Subscribe to:
Posts (Atom)


